Tired of your plants drying out while you’re away or forgetting to water them? A self-watering planter is an easy, low-hassle solution that keeps your plants happy for longer.
Is it possible to make a planter self watering without the effort of having to water them everyday? In this article, we’ll show you how to make a self-watering planter using just a few bits you probably already have at home. Whether you want to build a small pot or a full-sized self-watering planter box, we’ll walk you through each step. It’s simple, cost-effective, and ideal for any polytunnel or garden setup.
Key Points:
- Learn how to make a planter self watering with a DIY reservoir system
- Use a bottle, a saucer, and a PVC pipe to build a self-watering setup
- Great for veg, herbs, or flowers—especially when you’re away
- Saves time, reduces water waste, and cuts back on weeding
- Works well in pots, grow bags, or planter boxes in your polytunnel
Supplies You’ll Need to Make a Self-Watering Planter
If you’re wondering how to make a self watering planter, the good news is that you don’t need anything fancy. Most of the supplies can be found in your shed, kitchen, or local store. Whether you’re building a small pot or figuring out how to make a self watering planter box, the setup is pretty much the same.
What You’ll Need:
- A planter without drainage holes (plastic or ceramic both work)
- A sturdy plastic saucer (this creates your internal base)
- An empty 1–2 litre bottle (this acts as your water-wicking chamber)
- Around 2 feet of PVC pipe (your watering tube)
- A drill (for making holes in the bottle and pipe)
- A basic handsaw (for trimming plastic parts to size)
- Potting mix and the plants of your choice
How A Self Watering Planter Works
The whole idea behind a self-watering setup is pretty clever. You’re creating a mini water tank inside your planter. The saucer divides the pot into two parts—water on the bottom, soil and plant on top. Water is added through the PVC tube and stored in the bottom section. As the soil dries, it slowly pulls water upwards through a “wick” made from a bottle filled with soil.
Once you get your head around how to make a planter self watering, you’ll wonder why you didn’t try it sooner. It’s a game changer for gardeners who travel, forget to water, or simply want an easier life in summer.
Step-by-Step: How to Make a Self Watering Planter
Now that you’ve gathered your supplies, it’s time to build your self-watering system. Whether you’re making a small pot or figuring out how to make a self watering planter box, these steps will help you get the job done with minimal fuss.
1. Prepare the Wicking Bottle

Your empty plastic bottle is going to sit at the bottom of the planter and act as a wick. It’ll slowly pull water up from the reservoir to feed your plants.
- Start by drilling holes around the bottom half of the bottle. Around 5/8 inch in size works well, and you’ll want quite a few—this helps the soil draw water more evenly.
- Next, cut a hole in the centre of your plastic saucer, just big enough for the bottle to fit through. The bottle will sit in this hole once it’s trimmed to size.
- Slide the bottle through the saucer and place both into your planter.
- Push them down firmly. Then mark the bottle just above where it meets the saucer and trim off the top part. This should leave you with a neat wick that sits flush with the top of the saucer.
This simple bit of prep work is the core of how to make a planter self watering using everyday items.
2. Install the Watering Tube
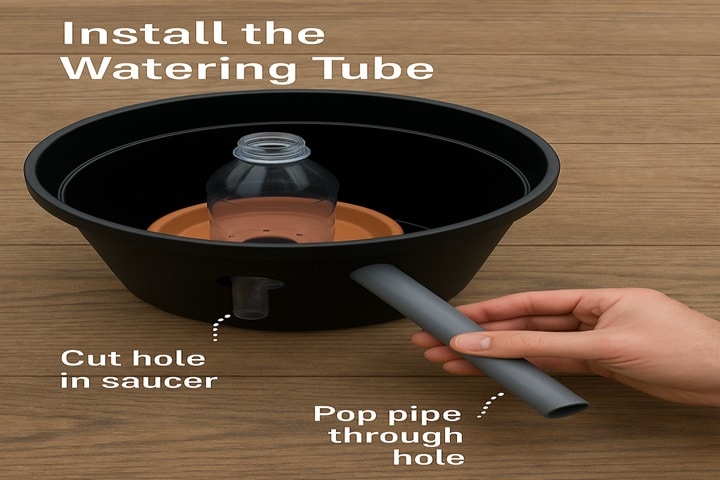
Now it’s time to prepare your PVC pipe, which allows you to pour water directly into the reservoir without disturbing the soil.
Lay the pipe flat on the saucer, somewhere between the edge and the bottle opening. Draw around it and then cut out the circle you’ve traced.
Pop the pipe through the hole so that it reaches the bottom of the planter.
Check how tall it looks from the top. You only need the tube to stick out an inch or two above the soil once everything’s planted. Mark the height, then saw it down to size if needed.
The watering tube is what makes this setup easy to refill. Once you understand how to make a self watering planter, this part becomes second nature.
3. Fit the Parts Together
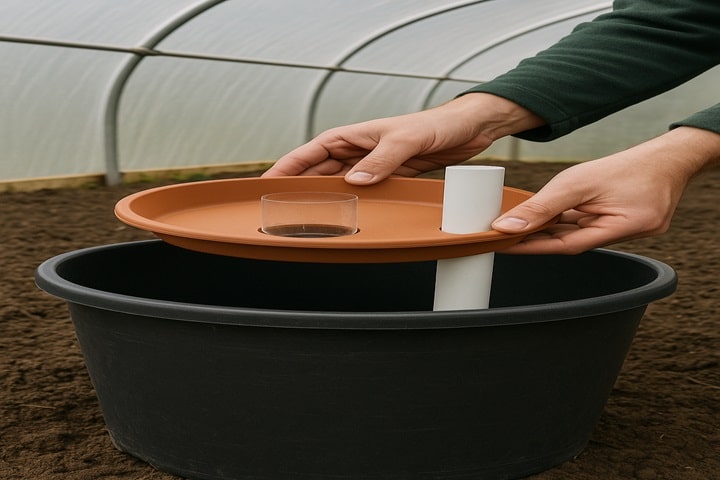
With your saucer, wicking bottle, and watering tube ready, it’s time to assemble your self-watering pot.
Insert the trimmed bottle and watering tube into their holes in the saucer.
Lower the saucer into the planter. It should sit flat and snug, creating a gap underneath for water to collect.
4. Add a Drain Hole
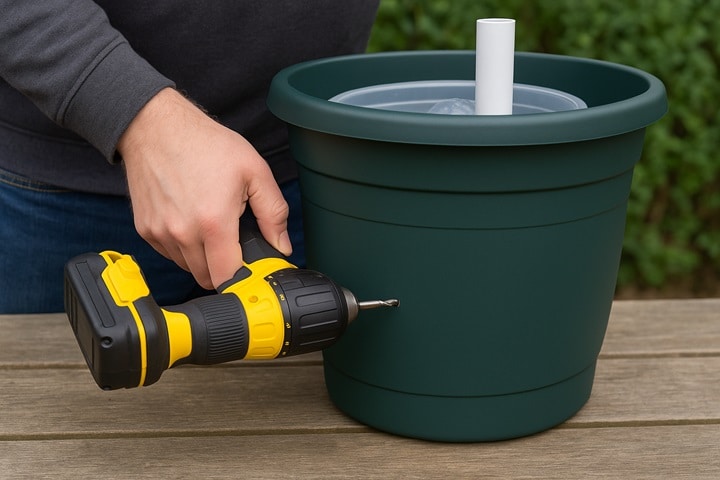
This bit is simple but important.
Drill a small hole into the side of your planter, just under the level of the saucer. You can eyeball it or measure from the inside.
This overflow hole will stop your planter from getting waterlogged and lets you know when the reservoir is full—it’ll drip or squirt out when you’ve added enough water.
5. Fill with Soil
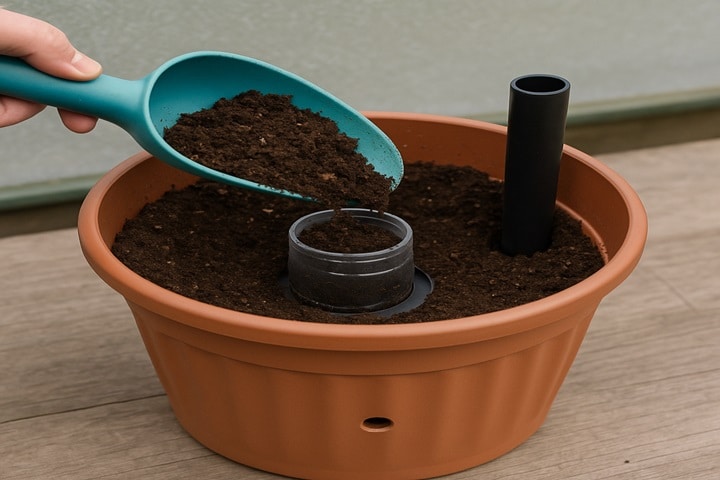
Start adding your potting soil slowly.
Use a cup or scoop to begin with so you don’t knock your setup out of place.
Make sure the bottle wick is filled with soil—this part needs to be packed so it can draw water upwards.
As you fill the rest of the planter, tilt the top of the watering pipe slightly toward the edge. This makes it easier to pour water in later and helps with flow at the base.
If you’ve followed these steps, you’ve just learned how to make a self watering planter box—or pot—that’s easy to manage and keeps your plants hydrated from below.
Why Self-Watering Planters Work So Well
Self-watering planters aren’t just about convenience. They’re a smarter way to keep your plants healthy, especially in warmer weather.
Because the water sits at the bottom, it evaporates slower and stays right where the roots need it.
You won’t see soggy soil on top—just a dry surface that’s better for stopping weeds.
If you’re away for a few days, your plants still get what they need without someone having to check in.
You’ll also waste less water compared to traditional top-down watering.
It doesn’t matter if you’re using pots in a polytunnel or planters on a patio—once you know how to make a self watering planter, it’s hard to go back.
Why First Tunnels Is the Perfect Partner for Self-Watering Projects
If you’re setting up self-watering planters in your small polytunnel or garden, First Tunnels has everything you need to make the job easier. From large polytunnels to fruit cages, our products work perfectly with DIY water-saving setups like these.
Whether you’re learning how to make a self watering planter box or experimenting with smaller pots, we can help you get more from your space, while saving time and water. After all, building a self-watering planter is simple, practical, and makes plant care much easier—especially in hot or dry conditions. With just a few tools and some recycled materials, you can easily make a planter self watering in a way that works for any garden or polytunnel.
Further reading:
Like what you have read? Here’s some further articles to aid your self watering planter experience –
Looking for another hands-off watering option? Learn how to make DIY ollas with terracotta pots in this step-by-step guide. A great low-tech method for keeping plants hydrated underground
FAQs
Can I convert a regular planter into a self-watering one?
Yes, you can convert most regular planters by adding a reservoir at the bottom, a water-wicking system, and an overflow hole to avoid flooding.
How do I refill a self-watering planter?
Use a watering tube or pipe that leads directly into the reservoir. Pour water into the tube until it reaches the overflow hole to avoid oversaturating the soil.
Do self-watering planters work for all types of plants?
They work best for herbs, vegetables, and many houseplants. However, plants that prefer dry conditions—like succulents or cacti—may not be suitable for this system.
Sources
Anderson, T., (2024) How to Make DIY Ollas Using Terracotta Plant Pots. Lovely Greens. [online] Available at: https://lovelygreens.com/how-to-make-diy-ollas-low-tech-self-watering-systems-for-plants/ [accessed 14/05/2025]