How to Fit a Sprinkler System in a Polytunnel (Step-by-Step Guide)
Keeping crops evenly watered inside a polytunnel can quickly become time-consuming, especially during warm weather. A well-planned sprinkler system takes much of the hard work away and helps create healthier, more consistent growth across the whole space.
In simple terms, fitting sprinkler system pipework in a polytunnel involves planning your layout carefully, attaching the main water line, positioning sprinkler heads correctly, and regulating water pressure so every area receives even coverage. Once installed properly, the system can save hours of manual watering every week.
In this guide, I’ll walk through the process step by step, including layout planning, tools and materials, pressure control, common mistakes to avoid, and practical tips I’ve found useful over the years when growing under cover.
For more watering advice, take a look at these smart irrigation tips for polytunnel growers.
Key Takeaways
- Sprinkler systems provide even overhead watering throughout the polytunnel
- Correct spacing, usually around 1 to 1.2 metres, helps prevent dry patches
- Planning the layout first makes installation much easier
- Pressure regulation is important for reliable performance
- Irrigation kits can simplify fitting sprinkler system components together
What Is a Polytunnel Sprinkler System and How Does It Work?
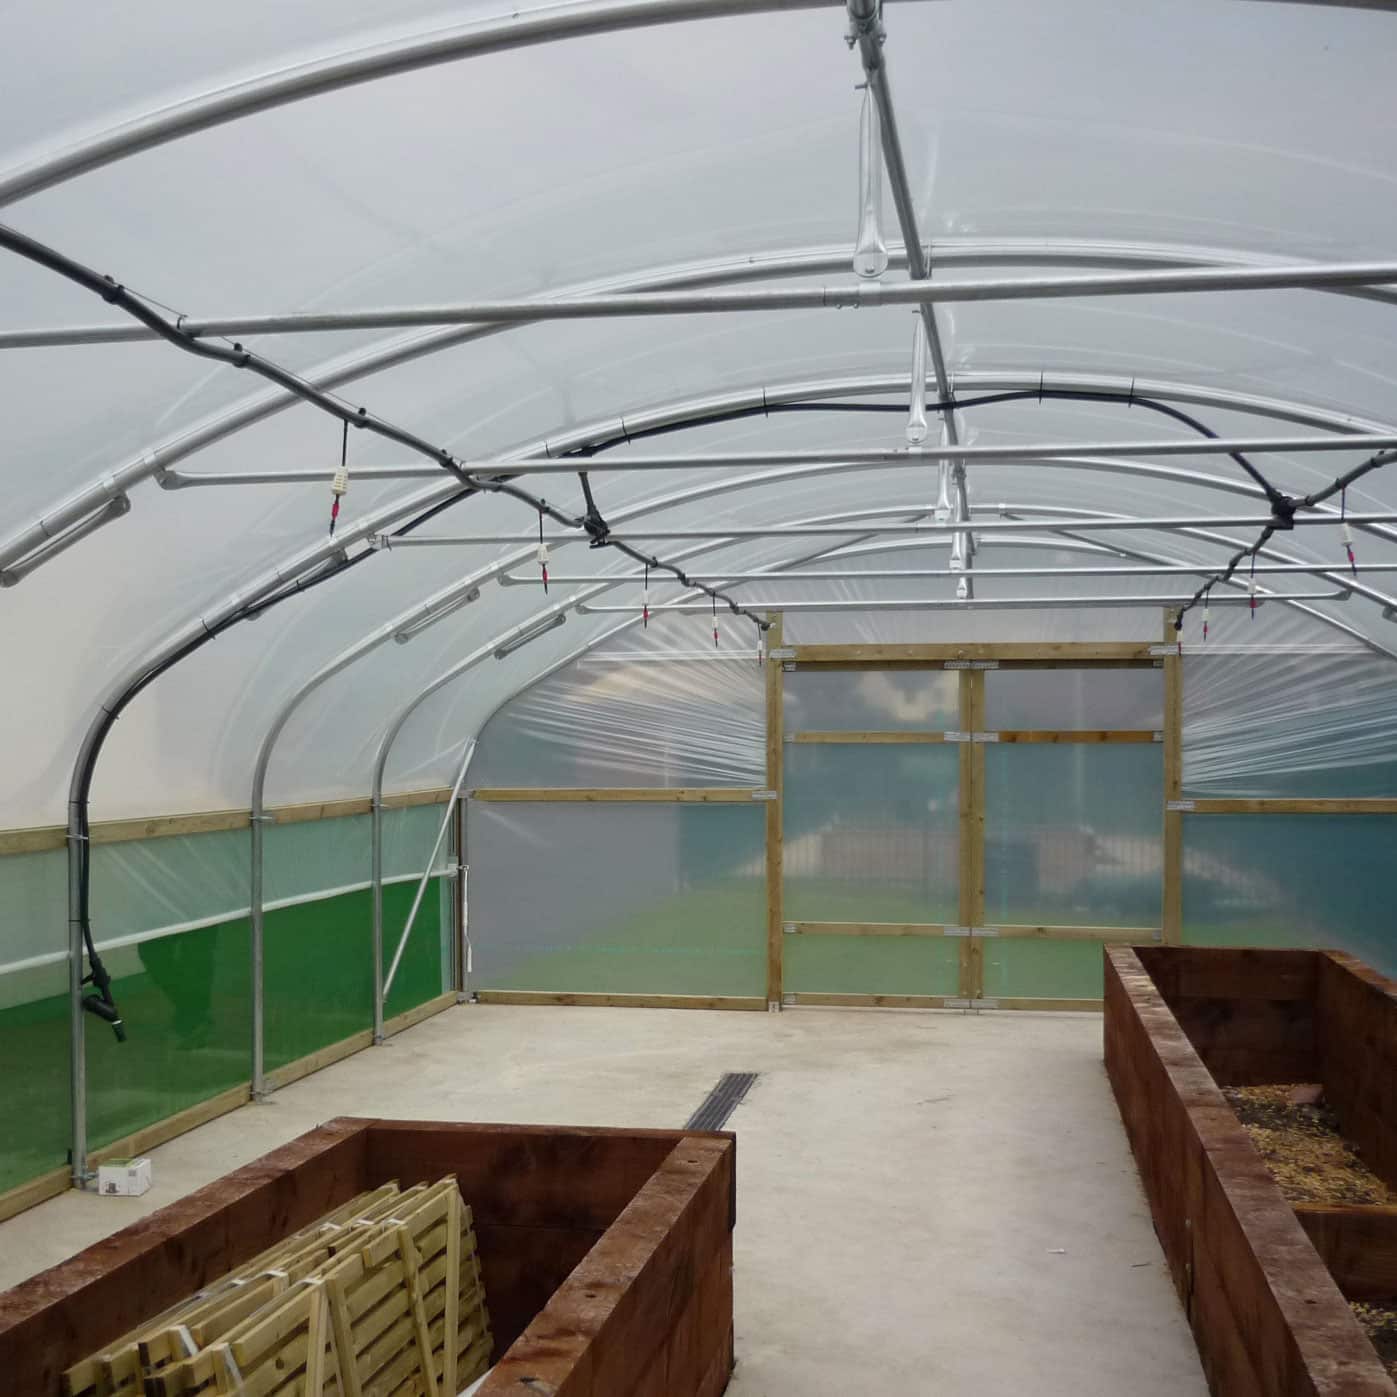
A polytunnel sprinkler system creates an overhead watering effect similar to rainfall. Water travels through a main supply pipe running along the tunnel, then into smaller drop tubes fitted with sprinkler heads positioned above the crops.
In most setups, the system works like this:
Water source – main pipe – drop tubes – sprinkler heads – crop coverage
The sprinkler heads distribute water in overlapping patterns, helping to ensure plants receive consistent moisture across the growing area.
Single-Line Systems
A single overhead line usually runs along the centre ridge of the tunnel. This setup often works well in narrower domestic polytunnels where crops are grown evenly on both sides.
Multi-Line Systems
Wider tunnels may need two or more irrigation lines to maintain even coverage. This is especially important where benches, staging, or dense planting layouts interrupt water distribution.
In my experience, sprinkler systems are particularly useful for:
- Seedlings and young plants
- Salad crops
- Propagation areas
- Crops needing higher humidity
- Full-bed watering
They are generally less suitable for crops that dislike wet foliage, such as tomatoes late in the season.
When Should You Use a Sprinkler System Instead of Drip Irrigation?
Both systems have advantages, and the best option depends on what you’re growing and how you use your tunnel.
| System | Best For | Advantages | Drawbacks |
|---|---|---|---|
| Sprinkler irrigation | Seedlings, salads, propagation | Full coverage, humidity support, quick watering | More evaporation, less water-wise and efficient |
| Drip irrigation | Tomatoes, cucumbers, peppers | Water efficient, targeted root watering | Less overall coverage |
| Soaker hose | Raised beds, simple layouts | Easy installation, more directed watering than sprinklers | Less precise coverage than drip systems |
Sprinklers are not typically the most water-wise or sustainable solution, but when growers want:
- Fast overhead watering
- Even moisture across larger planted areas
- Humidity support for germination
- Simple coverage for mixed cropping
Then a sprinkler system may occasionally be the way to go.
Remember, however, that drip systems are usually more efficient for mature fruiting crops where keeping foliage dry matters more for disease control, and are far more water wise and sustainable options in many cases.
Tools and Materials You’ll Need
Before fitting sprinkler system components together, gather everything in advance. It makes installation far smoother.
Essential Materials
- LDPE or poly irrigation pipe
- Sprinkler heads
- Drop tubes
- Pipe connectors and tees
- End stops
- Valves
- Pressure regulator
- Hose connector or tap adaptor
- Support clips or wire fixings
Tools
- Pipe cutters
- Pliers
- Adjustable spanner
- Measuring tape
- Marker pen
- Step ladder
Tip: Lay all components out inside the tunnel before installation begins. It helps identify spacing issues early and avoids unnecessary adjustments later.
If you prefer a simpler setup process, ready-made polytunnel irrigation systems and watering kits can save a considerable amount of time.
Planning Your Sprinkler Layout Inside the Polytunnel
Good planning is one of the most important parts of fitting sprinkler system pipework successfully.
I always start by considering three things:
- Tunnel width
- Crop layout
- Water pressure available
Sprinkler Spacing
As a general guide:
- Position sprinkler heads around 1 to 1.2 metres apart
- Ensure spray patterns overlap slightly
- Avoid placing heads too close to tunnel sides
Too much spacing creates dry zones. Too little can lead to excessive moisture and wasted water.
Pipe Routing
In narrower tunnels, a single ridge-mounted pipe is often enough.
For larger structures:
- Use multiple lines
- Split watering zones if needed
- Keep pipe runs as straight as possible
Water Source Position
Try to position your supply point near one end of the tunnel. This keeps routing straightforward and reduces unnecessary bends in the system.
Key Point: Long pipe runs with multiple sprinkler heads may reduce pressure at the far end. In larger tunnels, zoning can improve consistency.
Step-by-Step Guide to Fitting a Sprinkler System
For growers wanting a quicker installation route, these overhead irrigation kits for polytunnels can simplify the process considerably.
Step 1: Install Support Wire or Ridge Fixings
Start by securing support wire, brackets, or clips along the ridge of the tunnel.
This creates a stable fixing point for the main irrigation pipe and helps maintain consistent sprinkler height throughout the structure.
Step 2: Attach the Main Pipe Along the Tunnel Length
Run the main LDPE pipe along the ridge line or planned route.
Secure it firmly using clips or ties at regular intervals. Avoid sagging sections, as these can affect pressure and water distribution.
Step 3: Connect Drop Tubes and Sprinkler Heads
Attach drop tubes at the planned spacing points.
Then fit the sprinkler heads securely. I usually check alignment carefully at this stage because even slight angle changes can affect spray overlap.
Step 4: Route Pipe to the Water Source
Connect the main line to your outdoor tap, tank, or irrigation supply.
If possible, include:
- A shut-off valve
- Pressure regulator
- Filter
These additions improve long-term reliability considerably.
Step 5: Connect and Secure All Fittings
Check every connector carefully.
Loose fittings are one of the most common causes of leaks after fitting sprinkler system components together.
Step 6: Test the System and Adjust Coverage
Turn the water on gradually and inspect the whole tunnel.
Look for:
- Uneven spray patterns
- Dry patches
- Dripping joints
- Excess pressure
- Blocked nozzles
Small adjustments now can make a big difference later.
Setting Up Water Pressure and Flow Control
Pressure regulation matters more than many people realise.
Too much pressure can create misting and uneven spray patterns. Too little may leave parts of the tunnel dry.
A pressure regulator helps maintain balanced flow across the entire system.
Simple Ways to Improve Performance
- Use a regulator matched to your sprinkler heads
- Avoid excessively long pipe runs
- Split large tunnels into zones
- Flush the system occasionally to remove debris
I’ve found that testing pressure during the warmest part of the day often gives the clearest picture of real-world performance.
Common Mistakes When Installing Sprinkler Systems
Many watering issues come down to planning mistakes rather than the system itself.
Problems I See Most Often
- Sprinkler heads spaced too far apart
- Uneven pipe layouts
- Ignoring pressure requirements
- Loose fittings causing slow leaks
- Using overhead watering for crops that prefer dry foliage
- Installing heads too low beneath dense foliage
Fortunately, most problems are easy to correct once identified.
Tips for Getting Even Water Coverage
Even coverage is the goal of any good sprinkler setup.
Practical Tips
- Keep sprinkler spacing consistent
- Position heads at equal heights
- Check spray overlap carefully
- Water early morning or evening
- Monitor coverage as crops grow taller
- Adjust head positioning seasonally if needed
Dense summer growth can alter spray patterns surprisingly quickly, especially in highly productive tunnels.
Quick Tip: Walk the tunnel during watering occasionally. Dry corners and shadowed areas are often easier to spot while the system is running.
Maintaining Your Sprinkler System
Regular maintenance helps prevent frustrating mid-season problems.
Maintenance Checklist
- Clean sprinkler nozzles regularly
- Inspect fittings for leaks
- Flush pipes periodically
- Check filters for blockages
- Replace worn seals or connectors
- Adjust layouts as crops change
At the end of the season, I usually drain the system fully before winter to reduce the risk of frost damage.
Choosing the Right Polytunnel Setup for Irrigation
The structure itself plays an important role in how effective your irrigation system will be.
Strong ridge supports, sensible access points, and well-planned internal layouts all make fitting sprinkler system components easier and more reliable long term. Wider tunnels may also benefit from additional irrigation zones to maintain consistent coverage throughout the growing space.
Well-designed domestic polytunnels for efficient irrigation setups can make pipe routing, sprinkler positioning, and ongoing maintenance much simpler.
A properly installed sprinkler system can transform the way a polytunnel is managed. Consistent watering not only saves time, but also improves crop health, reduces stress on young plants, and creates a more stable growing environment overall.
The key is careful planning before installation begins. Correct spacing, sensible pressure control, and reliable fittings all make a significant difference to long-term performance.
For many growers, especially those managing larger tunnels, irrigation kits can remove much of the guesswork and help create a dependable setup more quickly.
Frequently Asked Questions
Can I install a sprinkler system myself?
Yes. Most hobby growers can install a basic sprinkler system using standard irrigation components and simple hand tools. Careful planning is usually more important than technical skill.
What is the best irrigation system for a polytunnel?
It depends on the crops being grown. Sprinkler systems work well for seedlings and full coverage watering, while drip irrigation is often better for mature fruiting crops such as tomatoes and peppers.
What is the 30/30 rule in irrigation systems?
The 30/30 rule commonly refers to watering deeply enough for moisture to penetrate around 30cm into the soil while avoiding watering more than every 30 minutes in a single cycle. Exact usage varies depending on irrigation design.
How deep should irrigation pipes be installed in a polytunnel?
Most overhead sprinkler systems use surface-mounted pipework attached to the tunnel frame. If underground supply pipes are used, they are typically buried below frost depth, usually around 45cm or deeper in the UK depending on location.
Royal Horticultural Society (RHS) (2026) Garden watering methods. Available at: RHS Garden Watering Methods (Accessed: 19 May 2026).