How to Make Soil Blocks for Seed Starting
Using a soil blocker to make soil blocks for seed starting is one interesting alternative to the more traditional ways of doing things.
One of the goals for sustainable gardeners is reducing the use of single use plastics. One way to reduce your use of plastic seed trays and pots is to avoid using containers altogether.
Unlike the plastic in a polytunnel, which can last for many years, much of the plastic we use to start seeds and grow plants is brittle, and won’t last long.
Of course, one important part of the puzzle is using what plastic we do have for as long as possible. But it is also important to avoid buying new plastic seed trays and pots. Using a soil blocker to make soil blocks could be the perfect way to go plastic-free in your seed-starting endeavours.
What Are Soil Blocks?
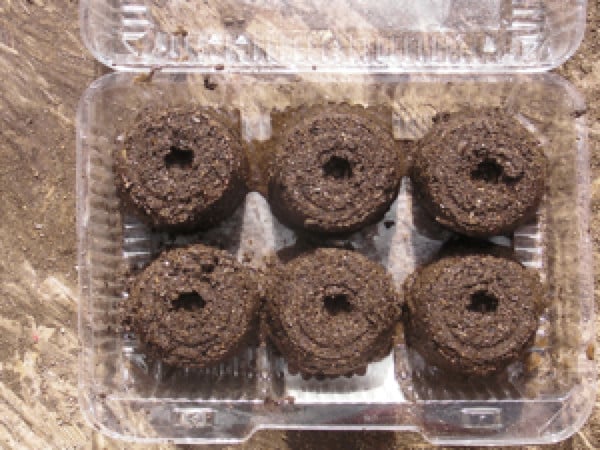
Soil blocks are exactly what they sound like. They are blocks made from partially compressed soil or potting mix that will hold together on their own without the need for a surrounding container.
Using a soil blocker to make soil blocks is like building a sandcastle – except that rather than working with sand, you are working with a growing medium into which you can sow your seeds.
What are Soil Blockers?
A soil blocker is exactly what it sounds like too – this is a device or tool that makes it easier to make these blocks for seed starting. There are a range of soil blockers or block makers that you can buy.
There are a number of different models on the market, some more sophisticated than others. None are hugely expensive.
But before you rush out and buy one, you may like to consider the idea of making your own. This is a simpler and more straightforward project than you might imagine. And you can often use things that you may already have lying around at home.
Why Use Soil Blocks?
There are several benefits to using soil blocks rather than pots for seeds and seedlings. First of all, of course, soil blocks can save money, since you won’t need to buy pots or containers. This also has a number of environmental benefits. As mentioned above, using soil blocks helps you to avoid the use of disposable plastic items.
But over and above the potential financial and environmental benefits, soil blocks are also good for your growing efforts. Seeds and plants grown in soil blocks rather than pots are able to ‘breathe’. Their roots will not get pot bound, and will naturally spread to fill the block. This can get them off to a better start.
How To Make Soil Blockers
In order to make a simple soil blocker, you will need something to form the shape by packing the soil into it, and a second part, which will allow you to compress the soil by pushing it down firmly and backing it into the first part.
Making a Form to Compress Soil Into
There are a number of household waste items/ reclaimed materials that you could use to create this first part of your simple soil blocker. The size of this form will dictate how large your soil blocks will be. You can make small plugs for seeds by using:
- Tube sections cut from old plastic medicine bottles or similar.
- The side walls of small tin cans such as those used for tomato paste or fast action yeast, for example.
- Sections of metal or plastic piping.
You can also make soil blocks that are a similar size to small plant pots by using:
- The walls of regular tin cans.
- Tube sections cut from plastic salt containers or other sturdy plastic containers.
- Small, sturdy square/ rectangular containers with the bases and tops cut off.
- Sections of old drain pipes or other wider reclaimed plumbing pipes.
When you use your imagination, you will discover that there are plenty of different materials that you could repurpose. The general idea is to create a section of tube into which soil can be placed, before it is compressed using the second component of the soil blocker.
Making a Compression Tool For Your Soil Blocker
When choosing a form for your soil blocker, you should think about what you might be able to use to compress the soil within it. Ideally, you want something flat that can almost fill the tube or square frame you have made. You’ll then need a sturdy handle that will allow you to push down on the soil in the form to compress it and make your blocks.
To make your compression tool, one idea (for a round form such as a tin can) is to use the lid of a jam jar, or similar. You should make a hole in the middle of the lid, then use a bolt to secure it to a wooden handle. (You could use a branch from your garden for this, or repurpose the end of a wooden broom handle or similar.)
Push down on the soil inside your form using the handle for force the lid down onto the soil. The end of the bolt will make a divot in the centre of each soil block, where a seed can be placed. You can then gently slide the form upwards to release each block.
If a lid is not suitable, you could consider cutting a wooden block, or wood slice to fit inside your form. You could potentially saw sections off branches from your garden, or use reclaimed wood for the purpose.
Making a soil blocker really can be as simple as constructing those two simple components. But you may have noticed that the difference between this idea, and the soil blockers you can buy is that the ones you can buy allow you to make several soil blocks at the same time.
Making Multi-Block Makers
If you want to streamline operations, and make a number of soil blocks at the same time, you can still potentially make your own.
A number of DIYers have made their own multi-block makers using wood and sheet metal and a few other simple components. Others have even extended the ideas mentioned above and make their own multi-block makers using household waste.
For example, you might be able to make your own by making a frame with compression devices that compact soil within several tin cans or other forms at the same time.
While these plans are somewhat more complex to make than the simple ideas mentioned above, they are relatively easy to make if you have a few simple DIY skills.
Soil Blocker Mixture Recipe
It does not matter whether you buy or make a soil blocker. The principles are more or less the same. And you will need to bear the same things in mind when choosing what to make your soil blocks with.
A good potting mix of soil/ compost/ leaf mold of other such materials will be key. You can obviously buy your seed starting mix. But you may also be able to consider making your own.
I use a combination of my clay loam soil, home-made compost, and home-made leaf mould. The mix is not sterile, so there can occasionally be problems with damping off and weed seeds. But I generally do not find that I have too many issues. And I prefer to use what I have rather than buying peat-based commercial seed starting mixes. But there are a number of peat-free options for seed starting on the market.
If you are buying in materials, note that you might combine ingredients like coir with a seed starting compost in order to make a mix that holds together well in blocks. A typical commercial seed starting potting mix or compost likely won’t hold together as well as a blend made with this and other materials. Sometimes, horticultural sand might also be added to the mix.
As well as carefully considering the mix you use, you also need to make sure that the mix is moist though not too wet. Place the mix in a tray and add water, until it will just hold together when you take a handful and squeeze it. Get the moisture level right and you will be far less likely to have trouble with blocks crumbling or falling apart as you make them.
Make your own soil blocker and you will be able to use it to make plenty of soil blocks to get your garden off to a good start. So if you are looking around to find pots and containers this spring, this is definitely one interesting alternative to consider.
How To Care For The Seedlings In Your Soil Blocks
Once seeds have germinated, seedling in soil blocks can be cared for just as you would care for seedlings growing in pots.
Make sure that you leave these within a waterproof tray in a light and reasonably warm location, then, when it comes time to transplant your seedlings, you can simply harden them off then plant them out into their final growing positions in your garden – block and all.
References:
https://www.bhg.com/gardening/how-to-garden/seed-starting-with-soil-blocks/